
Introduction
Thank you for taking an interest in the Trinity Audio WordPress plugin. In this manual, we’ll walk you through how to install and use the plugin on your website. Before installing, please make sure that your website meets the requirements for the plugin. If any questions arise, don’t hesitate to reach out to our team at support@trinityaudio.ai and we’ll make sure to help out.
Installation
First, log into your WordPress dashboard and click on “Plugin”:

Click “Add New” next to the “Plugins” headline:

Search for “Trinity Audio” in the search console in the top right:
You will now see the Trinity Audio plugin below.
Please make sure that the plugin is compatible with your version of WordPress (marked in green).
Press the “Install” button – marked in red:
And the button would change to “Activate”:
Click on it and wait for success feedback from WordPress.
Next, register and approve the T&C:
Configuring the plugin
After the plugin is installed successfully, you will see the Trinity Audio menu on the management dashboard on the left side. You would see a status bar notification on the top mentioning that the plugin is not active yet:
Once you finish the configuration process, click “Save Changes” and then follow the final step to activate the plugin.
Post Management
Once your configuration changes are saved, please use the Post Management window to choose where the plugin should be activated.
You can enable the Trinity Audio Player on all posts, or choose to manage it manually for each post individually. For more details, please check our WordPress Plugin: Manage posts in bulk guide. Click "Submit" to save changes.
Setup
Now let’s go over the different setup options in the Trinity Audio management tab. As you can see, it is divided into 3 sections:
- General configuration
- Textual configurations
- Player settings
- Advanced settings
General configuration
Textual configurations
Player settings
Advanced settings
Let's go over each in detail:
General configuration:
.avif)
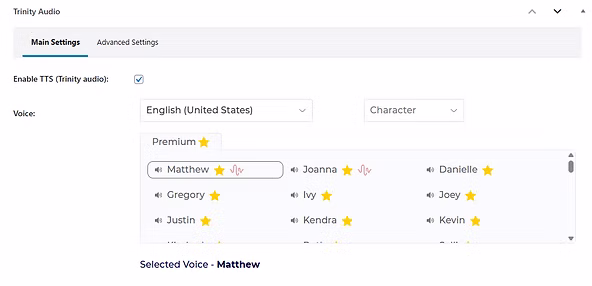
- Select a narrator for your content: Please choose the language of your content and the voice you would like to use. In case you have multiple languages on your site, choose the main one and configure the correct language on an individual post level.
- Voice style: Choose the type of reading you would like to use. For example, choose news (formal) for formal news content. Please note that only narrators that have a wave icon next to the support voice styles.
- Play premium version: in case the voice has a better version than the one chosen, click it to hear how it could sound like
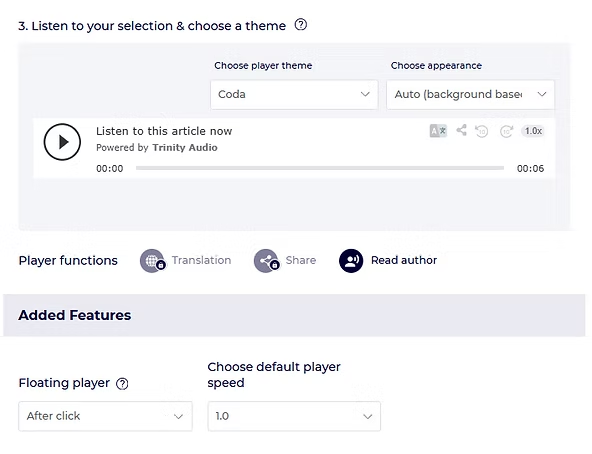
- Theme: Choose the player theme that best suits your page's look and feel.
- The player itself: Click the play to listen to a sample from the selected narrator.
Select a narrator for your content: Please choose the language of your content and the voice you would like to use. In case you have multiple languages on your site, choose the main one and configure the correct language on an individual post level.
Voice style: Choose the type of reading you would like to use. For example, choose news (formal) for formal news content. Please note that only narrators that have a wave icon next to the support voice styles.
Play premium version: in case the voice has a better version than the one chosen, click it to hear how it could sound like
Theme: Choose the player theme that best suits your page's look and feel.
The player itself: Click the play to listen to a sample from the selected narrator.
- Player features: add the relevant player features to your site.
- FAB: enable a Floating Action Button that will control the player for users scrolling while reading.
- Default player speed:Choose the default player speed. Listeners could still change it from the player menu if needed.
Player features: add the relevant player features to your site.
FAB: enable a Floating Action Button that will control the player for users scrolling while reading.
Default player speed: Choose the default player speed. Listeners could still change it from the player menu if needed.
Textual configurations:
- Skip tags: Use this if you are using tags in your content and you would like the player to avoid reading those tags.
- Allow shortcodes: By default, the TrinityAudio player will read only the textual content of your post and will filter out all additional texts generated using plugins or shortcodes. If you would like to add shortcodes that you would like the player to read, please add them using a comma delimiter. For example: gallery, myshortcode. After you change those settings, make sure to use “Activate for all posts” to allow those configurations to update.
Skip tags: Use this if you are using tags in your content and you would like the player to avoid reading those tags.
Allow shortcodes: By default, the TrinityAudio player will read only the textual content of your post and will filter out all additional texts generated using plugins or shortcodes. If you would like to add shortcodes that you would like the player to read, please add them using a comma delimiter. For example: gallery, myshortcode. After you change those settings, make sure to use “Activate for all posts” to allow those configurations to update.
Player Settings:
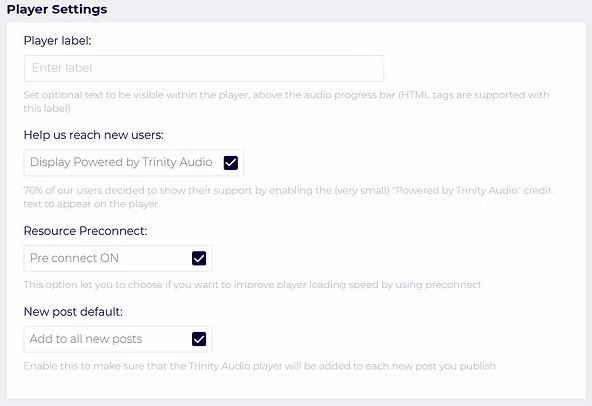
- Player label: Specifies optional text you’d like to be shown above the audio player (HTML tags are supported with this label). For example, here we chose “Check out our new audio content!”:

- Help us reach new users: select this option if you would like to be a pal and give us credit for the player. This will also help your colleagues (aka other content creators) reach out to us easily once they see the player on your site, get excited, and want to add it to their site as well. Now is a good time to remind you that we are providing the plugin for free 🙂 (cough).
- Resource preconnect:this feature will allow us to load the player faster on your page so we strongly advise enabling it.
- New post default:Enable this to make sure that the Trinity Audio player will be added to each new post you publish.
Help us reach new users: select this option if you would like to be a pal and give us credit for the player. This will also help your colleagues (aka other content creators) reach out to us easily once they see the player on your site, get excited, and want to add it to their site as well. Now is a good time to remind you that we are providing the plugin for free 🙂 (cough).
Resource preconnect: this feature will allow us to load the player faster on your page so we strongly advise enabling it.
New post default: Enable this to make sure that the Trinity Audio player will be added to each new post you publish.
Advanced Settings:
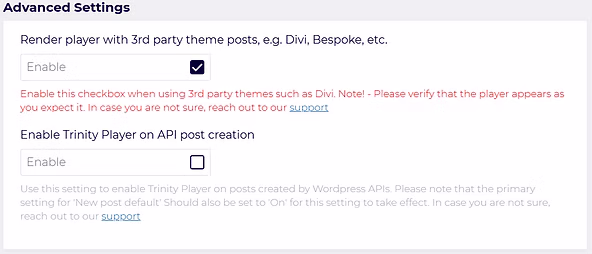
- Render player with 3rd party theme posts, e.g. Divi:In case you are using a third patty theme likeDivi,Bespoke, etc. enable this feature. It would allow the player to work with those themes.Don't use this settings unless you are sure. If there is any doubt, always consult with oursupport.If it doesn't help with your theme,sign up to our dashboardtoget a JS snippetthat supports all themes, pages and more.
- Don't use this settings unless you are sure. If there is any doubt, always consult with oursupport.
- If it doesn't help with your theme,sign up to our dashboardtoget a JS snippetthat supports all themes, pages and more.
- Enable trinity player on API post creation:In case you are using Wordpress API to create posts, you should use this setting.Make sure to mark every new post as active by default.Don't use this settings unless you are sure. If there is any doubt, always consult with oursupport.
- Make sure to mark every new post as active by default.
- Don't use this settings unless you are sure. If there is any doubt, always consult with oursupport.
Render player with 3rd party theme posts, e.g. Divi: In case you are using a third patty theme like Divi, Bespoke, etc. enable this feature. It would allow the player to work with those themes.
- Don't use this settings unless you are sure. If there is any doubt, always consult with oursupport.
- If it doesn't help with your theme,sign up to our dashboardtoget a JS snippetthat supports all themes, pages and more.
Don't use this settings unless you are sure. If there is any doubt, always consult with our support.
If it doesn't help with your theme, sign up to our dashboard to get a JS snippet that supports all themes, pages and more.
Enable trinity player on API post creation: In case you are using Wordpress API to create posts, you should use this setting.
- Make sure to mark every new post as active by default.
- Don't use this settings unless you are sure. If there is any doubt, always consult with oursupport.
Make sure to mark every new post as active by default.
Don't use this settings unless you are sure. If there is any doubt, always consult with our support.
Recommended setup process
Now that you understand all the options in the menu, here are the recommended steps for configuring the plugin:
- Choose the default source language.
- Filter the preferred gender.
- Open the premium voice tab.If locked, choose standard voices.
- If locked, choose standard voices.
- Listen to the different narrators and choose the one that best suits you.
- Choose a voice style you like and click on the player to listen to the sample.
- Check the “Add post title to audio” title option.
- Choose “Before post” in the “player position” section.
- Make sure the checkbox next to “Help us reach new users” is checked.
- Make sure the checkbox next to “Resource Preconnect” is checked.
- Make sure the checkbox next to “New post default” is checked.
- Click “Save Changes”.
Choose the default source language.
Filter the preferred gender.
Open the premium voice tab.
- If locked, choose standard voices.
If locked, choose standard voices.
Listen to the different narrators and choose the one that best suits you.
Choose a voice style you like and click on the player to listen to the sample.
Check the “Add post title to audio” title option.
Choose “Before post” in the “player position” section.
Make sure the checkbox next to “Help us reach new users” is checked.
Make sure the checkbox next to “Resource Preconnect” is checked.
Make sure the checkbox next to “New post default” is checked.
Click “Save Changes”.
Additional options
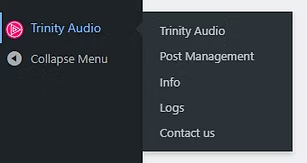
You might have noticed that there are a few additional sub-menus:
- Info: in case you are planning to re-install or migrate your site, use this section to grab the Recovery token. You would need to use it while re-installing the plugin.

- Logs:allow you to track and debug the different actions you’ve done using the plugin.
Logs: allow you to track and debug the different actions you’ve done using the plugin.
As you can see, all the different actions done by the author of this manual are logged and enable better debugging. In addition, as you can see at the top right corner, you have the option to send the logs to us so we’ll be able to help solve issues faster.

- Contact us:in case you want to reach out and let us know how much you like the plugin, or send us a log with bugs, you can use the “contact us” feature.As you can see, you need to fill out the following details:
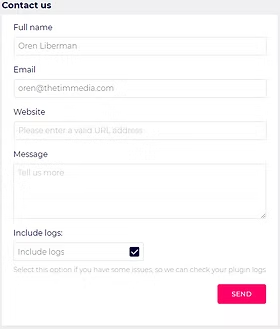
- Email: so we’ll know how to reach you backName:so we’ll know who you areMessage:what exactly do you like in the plugin or what’s not working as expectedAn Include logs checkbox:please check it if you’re having issues you would like us to help you solve as it will help us understand the issue better
- Email: so we’ll know how to reach you back
- Name:so we’ll know who you are
- Message:what exactly do you like in the plugin or what’s not working as expected
- An Include logs checkbox:please check it if you’re having issues you would like us to help you solve as it will help us understand the issue better
Contact us: in case you want to reach out and let us know how much you like the plugin, or send us a log with bugs, you can use the “contact us” feature.
- Email: so we’ll know how to reach you back
- Name:so we’ll know who you are
- Message:what exactly do you like in the plugin or what’s not working as expected
- An Include logs checkbox:please check it if you’re having issues you would like us to help you solve as it will help us understand the issue better
Email: so we’ll know how to reach you back
Name: so we’ll know who you are
Message: what exactly do you like in the plugin or what’s not working as expected
An Include logs checkbox: please check it if you’re having issues you would like us to help you solve as it will help us understand the issue better
Individual post configuration:
Once you’ve finished the setup of the Trinity Audio plugin on your website, let’s see what kind of settings you can configure per post.
Click on posts:

Choose a post you would like to edit or add the player to:

Scroll to the bottom of the page.
You will see the Trinity Audio menu:
In this menu you can choose the follo
wing:
- Enable Text-To-Speech (Trinity Audio): make sure this is checked if you want the player to appear on this post.
- Character: here you will see the default gender reading the text based on your choice. If you want to change it per this specific post, this is the place to do so.
- Language: choose the source language of the post. By default, you will see the language chosen in the general plugin settings.
Enable Text-To-Speech (Trinity Audio): make sure this is checked if you want the player to appear on this post.
Character: here you will see the default gender reading the text based on your choice. If you want to change it per this specific post, this is the place to do so.
Language: choose the source language of the post. By default, you will see the language chosen in the general plugin settings.
Once you’ve made sure the “Enable Text-To-Speech (TrinityAudio)” is checked, click “update” post and the player will appear on the post. Click preview to see it in the position chosen in the general settings.
Lastly,
Advanced settings
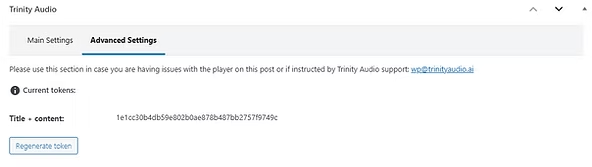
This section is for debugging purposes. In case you run into a problem, make sure all tokens are generated. If you reach out to our support, we might ask you to provide this information or to click on “Regenerate token”.
Summing things up
In case you have any further questions, please visit our FAQ page in WordPress and on our website. In addition, please don’t hesitate to reach out to us directly via wp@trinityaudio.ai, we would be happy to hear from you (pun intended).
Happy listening from all of us at Trinity Audio


